DIY Analogue ETI BulletPlug Interconnects Recipe
Eichmann Technologies International, from Australia, has released the ETI BulletPlugs which represents a radical departure from conventional 70 year old RCA designs. The ETI Bullet Plug is a minimalist design for maximum performance. Thickness, mass, materials, and contact surface area have been optimised to maintain signal integrity better than any RCA connector on the market. Most audio / video cables are made from highly conductive annealed Copper or Silver wires – terminated with low conductive, nickel and gold-plated brass RCA plugs. Annealed copper has a conductivity rating of at least 100% IACS (International Annealed Copper Standard). Brass has a conductivity rating of 28% IACS.

RCA plugs are coaxial designs (metal return / ground surrounding signal pin) where an impedance effect is naturally occurring. Impedance has a varied and adverse impact on performance. The ETI Bullet Plug solves this with a return pin that makes single point contact with the side wall of an RCA socket – concentrating electrons to one point thereby reducing distortion. This patented design is similar approach to “star earthing (grounding)” used in amplifiers. For ultra-conductivity ETI also offers the BulletPlug in pure silver. Utilising the same patented RCA blueprint, the Silver ETI Bullet Plug provides enhanced conductivity for what is arguably the absolute best level of performance available. The quality of the RCA plug can have a disproportionate effect on the final performance of the system. This is easy to understand when two points are taken into consideration. Here’s an easy DIY analogue ETI BulletPlug interconnects recipe:
Materials
- Set of 04 ETI BulletPlugs as this recipe is for a stereo connection
- Two sets of multi-conductor cables of equal length
- Wire cutter
- Wire stripper
- Helping hands with alligator clips or tweezers
- Table-top or suction base vise
- Solder
- Soldering iron with a minimum of 25 watts and a narrow conical tip
- Heat shrink in 02 different colors and sizes (optional)
- Heat gun (optional)
- Cable tester or a digital multimeter
Method
Turn on the soldering iron.
- Do this first so it is hot enough when you begin soldering.
- Make sure the tip of the iron is placed inside the soldering iron stand, and that it is safely out of the way so you do not accidentally bump into it.
Prepare the Cable.
- Cut the audio cables to the length that you need. For this recipe we will consider the cables as having 02 individually insulated and spaced solid core conductors – 01 for signal (hot) and 01 for return (cold) pins.

- Choose a length that is appropriate for the application. Recommended length is ideally between 0.5m to 10m.
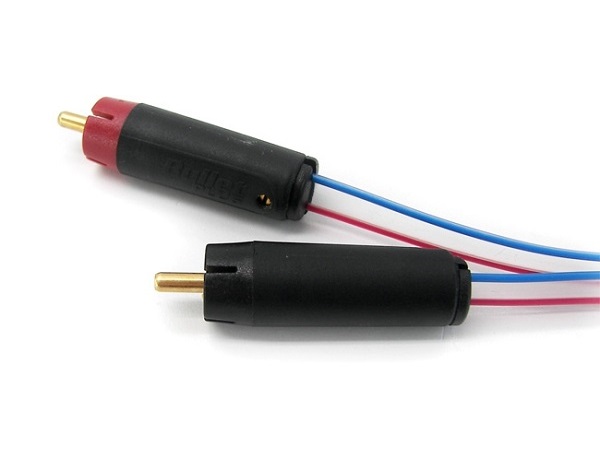
- The front section of the BulletPlug comprises two contact pins – the signal (large pin) and return (small pin). Both pins have a solder platform at the rear of the pin that is thinner than the rest of the pin.
- The platform heats up rapidly allowing quick and easy soldering.
- This means a soldering iron needs only minimal time in contact with the pins to melt solder. Excess contact time with the soldering iron may deform the plastic polymer housing.
Use heat shrink (optional).
- Cut a medium diameter heat shrink tube, designed for RCA plugs, about 2 inches (5 cm) long. Slide the heat shrink over the conductor wires onto the cable itself.
Disassemble your ETI BulletPlugs and keep all components neatly in one place.
- Being organized and methodical goes a long way in DIY cable making.
Slide the outer barrel and rubber bushing of the ETI BulletPlug end onto the cable past the conductor wires.
- This is necessary in order to be able to screw the barrel back once you’ve soldered the conductors to the ETI BulletPlugs.
Solder the return conductor.
- Insert the stripped signal conductor into the signal pin.
- Solder the return conductor to the solder cup of the return (small) pin. If the return conductor on the cable comprises multiple strands, twist these together and tin before connecting to the solder cup of the return pin. If the return conductor is in the form of a braid, then split the braid, gently twist and tin before connecting to the solder cup of the return pin.
- Ensure that the return conductor is formed (you may need to gently bend the conductor) so the conductor sits flush in the solder cup. The objective is to have the return conductor sit comfortably in the solder cup without pressure or stress on the wire.
- The small dimension of the solder cup of the return pin can make soldering large groups of wires difficult, however the small size of the pin also contributes to the dramatic sound improvement of the BulletPlug over standard RCA plugs.
Solder the signal conductor.
- Bend the signal conductor over the edge of the BulletPlug signal pin.
- Solder the signal conductor to the tip of the signal pin. This method is optional and is a speciality specific to the ETI BulletPlug as it uses a hollow tube as its signal pin. If you are using thicker conductors then you may also solder the signal conductor to the solder cup at the bottom of the signal pin exactly opposite the solder cup of the return pin.

Snip the extra signal conductor.
- Snip the remaining conductor protruding from the signal pin.
- Screw the bullet plug housing back over the ETI BulletPlug’s collar.
- Use the rubber bushing to close the rear of the open barrel and to hold the cable. Tighten the screws at the bottom of the barrel, on either side, this enables the rubber bushing to hold the wires more firmly.
Repeat the above steps for the remaining 03 ETI BulletPlugs.
Test the cables for continuity and correct polarity using a cable tester or a digital multimeter.
Apply medium diameter heat shrink, specifically designed for RCA plugs, partially over the ETI BulletPlug barrel and the cable using a heat gun for added appearance and rigidity (optional).
- If you plan on making multiple RCA cables for 5.1 or 7.1 application then use different colored heat shrinks for easy identification.
Tips
If possible, use a high-quality soldering iron. A good soldering iron heats up to a higher temperature than the lower-quality models. The process will be easier and the results will be much cleaner.
Before connecting the BulletPlug to cables be advised that the polymer should be allowed to adjust to the RCA socket. The BulletPlug collar is a glass impregnated polymer that has ideal resonance, electrical, and thermal properties; but given the dimensional tolerancing in RCA sockets, the polymer head should have an opportunity to conform and essentially “mould” itself to the socket it is to be connected to.
The BulletPlug should be handled delicately. For heavy duty use the conventional brass RCA plugs are a better choice.
The return pin of the BulletPlug is small and not as robust as the return on standard RCA plugs. Of course this also accounts for the improved sound quality.
The BulletPlug is designed to accept any interconnect, digital or video cable up to 9 mm diameter. This accounts for most cables. Large cables can also be accommodated if you strip the outer sheath and feed the insulated conductors through the housing.
Controversies
There are some controversies that every DIY audiophile and cable manufacturer is bound to face it at some point or the other. They make for some really interesting read. Here are the most popular ones:
Dielectric material: The type of dielectric material used affects the quality of sound. The lower the dielectric constant the better the sound quality.
Heat shrink: When used to add rigidity to the cable clamp could affect the quality of sound due to the change in the dielectric constant.
RCA plugs: Available in brass, copper and silver that are plated with noble metals to avoid corrosion. There is a school of thought that believes that the material used does not matter as long as the RCA plugs are well designed and made.

Conductors: Available as solid core or stranded ranging from 30 AWG (American Wire Gauge) to 22 AWG in 02 to 16 conductor / strand designs for making analogue interconnects. They are also available in copper and silver in various purity ratings. Copper is claimed to have a warm sound, whereas, silver is claimed to have a well-lit presentation. There is a school of thought that believes that a cable of sufficient gauge, regardless of the type of metal used, should not make any audible difference at all.
Shielding: A tubular copper or aluminium braid / foil which covers the entire length of the cable bundle is the standard. It’s suggested that most A/V playback systems may not need shielded RCA cables if the lengths are kept reasonably short. In some environment, unshielded RCA cables may introduce audible hum due to EMI (Electromagnetic Interference) / RFI (Radio-Frequency Interference) from adjacent electronic equipment or mobile phones.
Braiding: When 03 or more conductors are used braiding helps in cable management and appearance. Some claim that braiding also acts as a shield against EMI / RFI.
Wrap-up
Every cable design is subject to some kind of a compromise; it’s a balance between performance and penalties. This DIY analogue ETI BulletPlug interconnects recipe is just one way to skin a cat. This post is likely to be updated time and again with either relevant points or photographs.
Experienced DIY enthusiasts may have an advantage due to their thorough understanding of metallurgy, quality of materials used, cable geometry and of course craftsmanship that comes only with practice. If you have limited soldering experience, ask a DIY specialist to do the job for you.
DIY opens up to a world of endless possibilities for every audiophile. Apart from understanding and eliminating bottle-necks that improves A/V playback performance, it is also a very creative process. For more information on ETI BulletPlug please click on this—LINK.