DIY 47 Laboratory OTA Cable Kit Recipe
The 47 Laboratory, from Japan, has released the OTA Cable Kit which represents a radical departure from the conventional 70 year old RCA and speaker cable designs. The OTA Cable Kit is minimalist in design for maximum performance. The kit consists of 50m of STRATOS cable, 12 RCA plastic plugs and 08 Banana plugs.

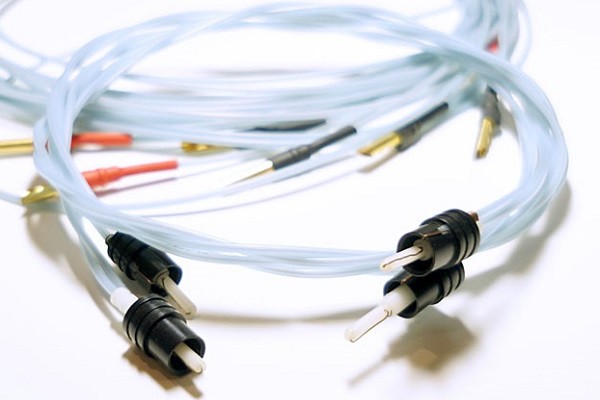
The 47 Laboratory (47 Labs) OTA Cable Kit allows the STRATOS cables to be directly connected to the plastic plugs without letting the signal go through performance penalising solders and brass RCA plugs with plating. The newly developed two-piece machined soft plastic plugs deliver the least colorations and one of the fastest speed possible in a RCA and speaker cable designs.
The 47 Labs STRATOS cable is a newly designed solid-core copper wire. Sufficiently thin solid-core single strand wire without plating. These are the necessary requirements for a conductor suitable for audio cables. The wire used for ‘STRATOS’ is a single strand of 0.4 m/m solid-core OFC copper wire. In combination with light and flexible tubing, this cable has a sensitive response to the rise and fall of signals, with uniform, even speed from the bottom end to the top end of audio frequency. Here’s an easy DIY 47 Laboratory OTA Cable Kit recipe:

Materials
- The 47 Labs OTA Cable Kit
- Wire cutter
- Wire stripper
- Cable tester or a digital multimeter
Method
RCA Cables
- Cut the STRATOS cables to the length that is appropriate for the application.
- Using a wire cutter strip off the polyethylene jacket from the tip of the STRATOS cable. The jacket needs to be stripped off for about 1” for the return and about 1 1/2” for signal conductors.
- Consider 04 conductors for a pair of analogue interconnects and 02 conductors for a digital interconnect—01 for signal (hot) and 01 for return (cold).
- The rear section of the plastic plug comprises two openings for—the signal (middle) and return (side) cables.


- Pass the bare conductor through the supplied hollow center plastic tip and firmly insert the polyethylene jacket at the bottom opening of the plastic tip.
- Bend the excess signal conductor over the edge of the plastic tip.
- Insert the plastic tip with the bent signal into the middle opening of the collar of the plastic plug.
- Insert the stripped return conductor into the side opening of the collar of the plastic plug.
- Bend the excess return conductor and tuck the wire neatly inside the collar of the plastic plug. Ensure the signal and return conductors don’t stand a chance to touch each other when being inserted into a RCA female socket.
- Repeat the above steps for the remaining 03 47 Labs OTA plastic plugs.
- Test the cables for continuity and correct polarity using a cable tester or a digital multimeter.
Speaker Cables
- Cut the cables to the length needed. Take off the jacket at the end of the cable using wire stripper. Use them as bare wires or with the supplied banana plugs.
Tips
When using a wire cutter, use a larger hole than actual 0.4mm. It is recommend to use 0.65 or 0.8 mm hole on the cutter, then twist the jacket from the cut portion and pull it off the STRATOS cable. If a 0.4mm hole is used, there is a possibility of cutting into the cable and damaging the conductor.
The bare conductor of the cable can be oxidized in due time. It is recommended to clean the bare conductors, once in every couple of months, using commercially available contact cleaners for optimum performance.
The 47 Labs plastic plugs should be handled delicately. For heavy duty use the conventional cables with brass RCA plugs may be a more practical choice.

Controversies
There are some controversies that every DIY audiophile and cable manufacturer is bound to face it at some point or the other. They make for some really interesting read. Here are the most popular ones:
Dielectric material: The type of dielectric material used affects the quality of sound. The lower the dielectric constant the better the sound quality.
RCA plugs: Available in brass, copper and silver that are plated with noble metals to avoid corrosion. There is a school of thought that believes that the material used does not matter as long as the RCA plugs are well designed and made.
Conductors: Available as solid core or stranded ranging from 30 AWG (American Wire Gauge) to 22 AWG in 02 to 16 conductor / strand designs for making analogue interconnects. They are also available in copper and silver in various purity ratings. Copper is claimed to have a warm sound, whereas, silver is claimed to have a well-lit presentation. There is a school of thought that believes that a cable of sufficient gauge, regardless of the type of metal used, should not make any audible difference at all.
Shielding: A tubular copper or aluminium braid / foil which covers the entire length of the cable bundle is the standard. It’s suggested that most A/V playback systems may not need shielded RCA cables if the lengths are kept reasonably short. In some environment, unshielded RCA cables may introduce audible hum due to EMI (Electromagnetic Interference) / RFI (Radio-Frequency Interference) from adjacent electronic equipment or mobile phones.

Wrap-up
Every cable design is subject to some kind of a compromise; it’s a balance between performance and penalties. This DIY 47 Laboratory OTA Cable Kit recipe is just one way to skin a cat. This post is likely to be updated time and again with either relevant points or photographs.
DIY opens up to a world of endless possibilities for every audiophile. Apart from understanding and eliminating bottle-necks that improves A/V playback performance, it is also a very creative process. This DIY cable recipe is one of the easiest as no soldering or crimping skills are required. The 47 Laboratory OTA Cable Kit is priced at USD 800 (equivalent of INR 50,000). For more information on 47 Laboratory please click on this—LINK.