DIY ETI Audio Express 4 Interconnects Recipe

ETI Audio, from Australia, has released Express 4 DIY Kit. The ETI BulletPlug is renowned as a totally new generation approach to RCA connection. It represents a wholesale rethinking of something as basic as the venerable RCA jack; a connector designed over half-a-century ago by The Radio Corporation of America. It is ETI Audio’s contention that the RCA plug in its current configuration is the standard connector in the audio/video industry not because it is the best possible choice for its intended use, but more by reason of default than any other.

A first evaluation of the RCA jack pointed up obvious metallurgical shortcomings. Most connectors, even those marketed as “deluxe” upmarket RCA jacks, are made from nickel and gold plated brass or phosphor bronze with a conductivity rating typically less than 28% IACS (International Annealed Copper Standard). As a comparison, the high purity copper used in the vast majority of interconnect cables has a conductivity rating of 100% IACS. Because of this low conductivity and the use of three disparate metals, it is ETI’s contention that standard RCA jacks—even expensive, flashy ones—compromise electron flow and diminish the performance of the components they connect.
The conductive surfaces of the ETI BulletPlug in contrast are machined from high-purity tellurium copper (over 90% IACS) or pure silver (106% IACS) to ensure maximum conductivity. This provides up to 320% greater conductivity than the gold plated brass connectors used in the vast majority of deluxe RCA jacks. Proven metallurgical choices result in better signal transfer, and electron flow that is consistent with the highest quality interconnect cables.
While the metallurgical understandings were significant—and rather straightforward—the second observation regarding the RCA jack turned out to be ground-breaking. It related to a problem, overlooked for decades, that is intrinsic to the RCA jack’s design— something as fundamental as the architecture of the jack itself.
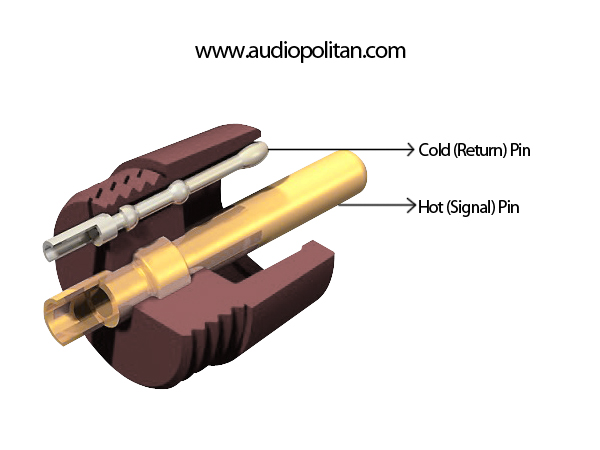
This RCA ground collar, acting as a conductor that transfers electrons from multiple directions between the centre pin and its surface—is prone to the small out-of-control turbulences called eddy currents. These turbulences are nothing less than electron chaos, exacerbated by the non-specific point of ground in the RCA jack’s design, as an entire surface encircling the centre pin forms the electrical ground.
Capacitive reactance and micro-arcing are additional artefacts of this architecture. Rather than encircle the centre conductor pin with a formed metal collar as ground, ETI opted for a single point ground contact similar to star earthing (grounding) in high-end electronics. ETI’s new design, featuring single point ground connection and optimised shape, mass and thickness of the conductive elements, eliminates every vestige of eddy current turbulence, capacitive reactance, and micro-arcing.
This is the DIY ETI Audio Express 4 Interconnects recipe that is included in the proprietary DIY kits. The kit includes all the cable parts needed to assemble a pair of ETI Audio Express 4 Interconnects. Tools, as listed below, will be required to assemble this cable.
Materials
- ETI Audio Express 4 Interconnects DIY Kit
- Wire cutter
- Wire stripper
- Helping hands with alligator clips or tweezers
- Table-top or suction base vise
- Solder
- Soldering iron with a minimum of 25 watts with a narrow conical tip
- Heat gun
- Cable tester or a digital multimeter
Preparation (Side A) Part 1
- Pre-cut eXpress4 Cable in 1m or 2m is already included in the kit.
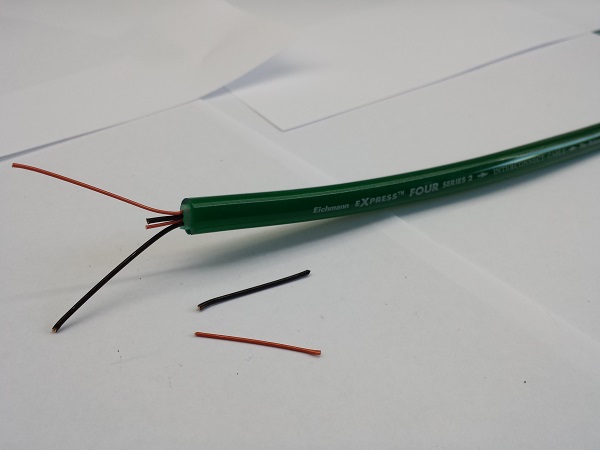
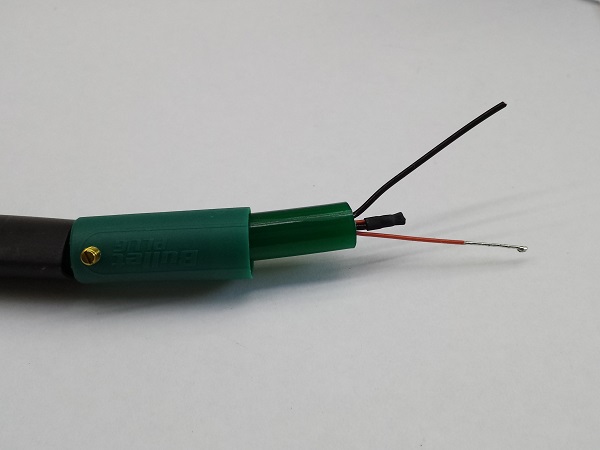
- Remove 35mm of outer sheath. Do not cut inner insulation (use cable cutter and then finish off with a pocket Knife).
- Repeat on both ends of the cable.
- Follow the arrows marked on the cable. Start at the beginning of the arrow flow.
- Cut the inner cables (cut 25mm leaving 10mm).
- Strip the inner cables (1.5 – 2mm) – Strip the offcut red wire (1.5 – 2mm). Discard the black wire cutoff.
- Tin both the offcut center wires.
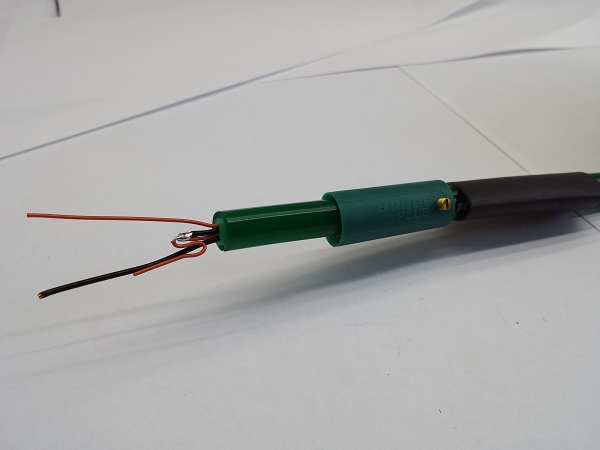
- Solder the offcut red wire to the 2 center wires.
- Fold the soldered wire in line with the black ground wire as shown in the above image.
- Insert 12.7mm glue-line heat shrink.
- Insert green Bullet Housing.
- Insert 2.5mm heat-shrink on the soldered joint of the inner wire.
- Using a hot air gun, heat shrink the joint.
Preparation (Side A) Part 2
- Strip 10mm off the red wire.
- Insert 1.5mm heat-shrink (15mm long) on the red wire.
- Tin the red wire.
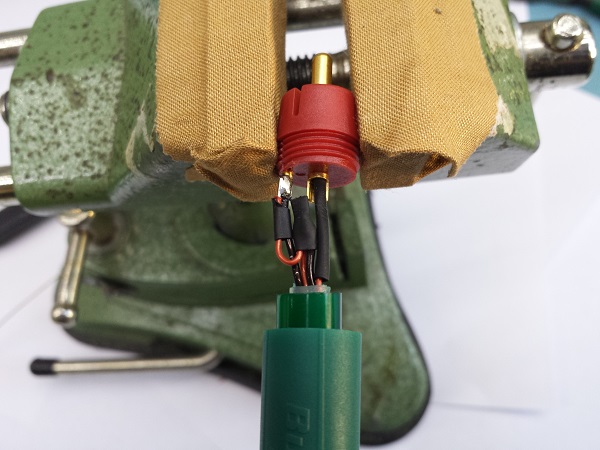
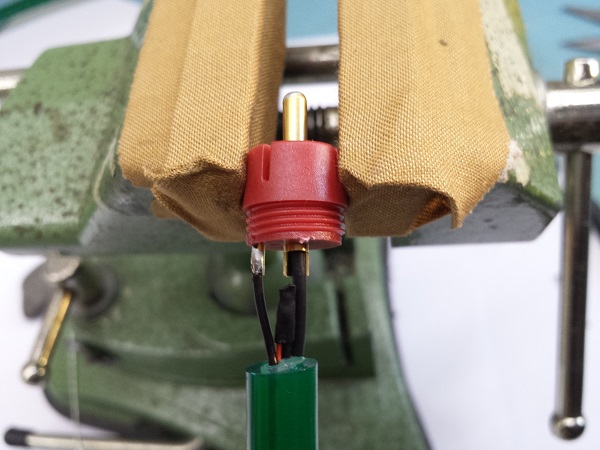
- Using a vice, hold the bullet in place.
- Push the red signal wire through the core BulletPlug pin to the tip.
- Solder the BulletPlug core pin tip ensuring a firm bond with the red signal wire through it.
- Cut the black and center red wires at the base of the return pin. Strip them 1.5-2mm.
- Insert 3-4mm of the 1.5mm heat shrink on the stripped wires and tin them.
- Tin the return pin. Solder them together.
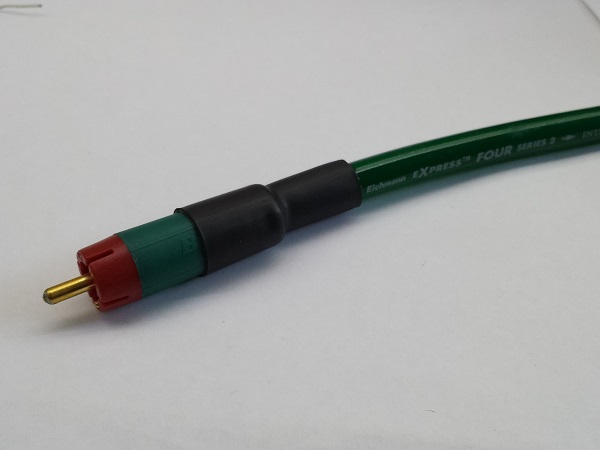
- Slide the housing up, apply a little glue on the thread of the Bullet and tighten the housing.
- Tighten the gurb screw to secure the cable.
- Pull the 12.7mm heat-shrink over the housing and heat to finish.
Preparation (Side B)
- Cut the inner cables (cut 25mm leaving 10mm).
- Strip the inner cables (1.5 – 2mm).
- Tin the cut center wires together using (ETI Silver Solder).
- Heat shrink the center wires together.
- Strip 10mm off the red signal wire and tin it.
- Push the red signal wire through the core BulletPlug pin to the tip. Solder the BulletPlug pin to the tip ensuring a firm bond with the red signal wire through it.
- Cut the black return wire at the base of the return pin, tin and solder to the return pin.
- Slide the housing up, apply some glue on the thread of the Bullet and tighten the housing.
- Tighten the gurb screw to secure the cable.
- Pull the 12.7mm heat-shrink over the housing and heat to finish.
Tips
- Do not overheat while shrinking to prevent melting the cables.
- Building up excessive solder at the tip of pin may damage the socket when connected.
- Before gluing, use a multimeter to test the continuity of the cable.
- When tightening, ensure only the housing turns and the cable remains static to avoid breaking the termination.
- Before connecting the BulletPlug ensure that the polymer is allowed to adjust to the RCA socket. The BulletPlug collar is a glass impregnated polymer that has ideal resonance, electrical, and thermal properties; but given the dimensional tolerancing in RCA sockets, the polymer head should have an opportunity to conform and essentially “mould” itself to the socket it is to be connected to.
- The BulletPlug should be handled delicately—ideally by holding the housing closer to the collar.
- The return pin of the BulletPlug is small and not as robust as the return on standard RCA plugs. Of course this also accounts for the improved sound quality.
- The BulletPlug is designed to accept any interconnect, digital or video cable up to 9 mm diameter. This accounts for most cables. Large cables can also be accommodated if you strip the outer sheath and feed the insulated conductors through the housing.
Wrap-up
Every cable design is subject to some kind of a compromise; it’s a balance between performance and penalties. This DIY ETI Audio Express 4 Interconnects recipe is just one way to skin a cat.
Experienced DIY enthusiasts may have an advantage due to their thorough understanding of metallurgy, quality of materials used, cable geometry and of course craftsmanship that comes only with practice. If you have limited soldering experience, ask a DIY specialist to do the job for you.
DIY opens up to a world of endless possibilities for every audiophile. Apart from understanding and eliminating bottle-necks that improves A/V playback performance, it is also a very creative process.
For more information on ETI Audio please click on this—LINK.